


Now Reading: HOW TO DRAW A FLOOR LAYOUT IN AutoCAD?
- 01
HOW TO DRAW A FLOOR LAYOUT IN AutoCAD?


Always remember to analyze the provided data before beginning the drafting stage.
Playing with and combining appropriate commands in AutoCAD can greatly assist us in completing our working drawing.
We will learn how to use commands efficiently in this session.
A STEP BY STEP APPROACH
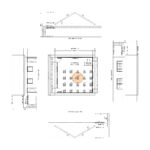
This classroom building sketch illustration features eight columns, two doors per room, and 10 sets of windows. Assume the column dimension is 300x300mm, the external wall thickness is 150mm, and the inside wall is removable or foldable.

Launch AutoCAD Application
1. Create your first column using Rectangle Command.
Command: REC RECTANG (ENTER)
Specify first corner point or [Chamfer/Elevation/Fillet/Thickness/Width]: 0,0 (ENTER)
Specify other corner point or [Area/Dimensions/Rotation]: @300,300 (ENTER)
Command: Z ZOOM (ENTER)
Specify corner of window, enter a scale factor (nX or nXP), or [All/Center/Dynamic/Extents/Previous/Scale/Window/Object] : E (ENTER)
2. Multiply the column.
Command: AR ARRAY 1 found (ENTER) Enter array type [Rectangular/PAth/POlar] : R (ENTER)
Type = Rectangular Associative = Yes
Select grip to edit array or [ASsociative/Base point/COUnt/Spacing/COLumns/Rows/Levels/eXit]: COL (ENTER)
Enter the number of columns or [Expression] <4>: 4 (ENTER)
Specify the distance between columns or [Total/Expression] <450.0000>: 8000 (ENTER)
Select grip to edit array or [ASsociative/Base point/COUnt/Spacing/COLumns/Rows/Levels/eXit]: R (ENTER)
Enter the number of rows or [Expression] <3>: 2 (ENTER)
Specify the distance between rows or [Total/Expression] <450.0000>: 7000 (ENTER)
Specify the incrementing elevation between rows or [Expresson] <0.0000>: (ENTER)
Select grip to edit array or [ASsociative/Base point/COUnt/Spacing/COLumns/Rows/Levels/eXit]: X (ENTER)
Command: Z ZOOM (ENTER)
Specify corner of window, enter a scale factor (nX or nXP), or [All/Center/Dynamic/Extents/Previous/Scale/Window/Object] : E (ENTER)
3. Create Exterior Wall
Command: ML MLINE (ENTER)
Current settings: Justification = Zero, Scale = 150.00, Style = STANDARD
Specify start point or [Justification/Scale/STyle]: S (ENTER)
Enter mline scale <150.00>: 150 (ENTER)
Current settings: Justification = Zero, Scale = 150.00, Style = STANDARD
Specify start point or [Justification/Scale/STyle]: J (ENTER)
Enter justification type [Top/Zero/Bottom] : Z (ENTER)
Current settings: Justification = Zero, Scale = 150.00, Style = STANDARD
Specify start point or [Justification/Scale/STyle]:
Command: MLINE (ENTER)
Current settings: Justification = Zero, Scale = 150.00, Style = STANDARD
Specify start point or [Justification/Scale/STyle]:
Command: Z ZOOM (ENTER)
Specify corner of window, enter a scale factor (nX or nXP), or
[All/Center/Dynamic/Extents/Previous/Scale/Window/Object] : E (ENTER)
Command: Specify opposite corner or [Fence/WPolygon/CPolygon]:
4. Create Doors and Windows
It’s preferable if you already have a library of blocks. However, if you do not have this library, let us begin the process of building one.
Door: 1000mm(W) x 40mm thickness
Window: 1200mm(W)
After you’ve created the blocks for the doors and windows, copy, paste, mirror, rotate and move it to complete the plan. After you’ve finished the layout, double-click the window to alter the blocks. Add detail to the blocks, and most significantly, add wipeout to the window openings, then repeat the process for door blocks.
Then, change the wipeout frame settings to “0” to see the opening.
Command: WIPEOUTFRAME (ENTER)
Enter new value for WIPEOUTFRAME <1>: 0 (ENTER)
5. Create interior wall
Since layout is typical just copy the exterior wall to inner wall location, and then change the Mline scale in the object properties dialog.